All Squared Up
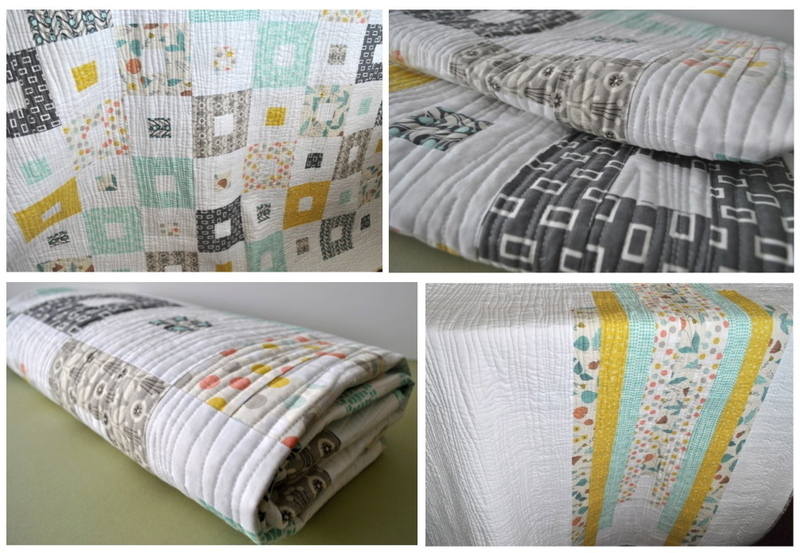
This fun project uses quick cutting and simple piecing to create a manageable sized quilt, finishing at approx. 56' x 56", that looks far harder than it actually is. If however you are completely new to quilting you may want to start with my Beginner's Quilt series, then come here when you're hungry for your next project!
A few notes before we start:
• Read all instructions before you begin.
• This pattern is based on fabrics that are 44” wide, if your fabrics are slightly less, I have recommended enough fabric to enable you to cut a couple of extra strips to compensate.
• WOF = width of fabric
• Seam allowances are ¼” unless otherwise stated.
So for this project, you will need:
• Eight long quarters in co-ordinating fabrics – for a more scrappy look, you could also use a 20-strip jelly roll (or sixteen 2½” x 44” strips) in co-ordinating colours - though the cutting is different for this, check below
• 2m plain white
• 40cm binding - you may be able to get this out of your eight long quarters depending on how many strips you have already used, but you will definitely need some extra fabric if you are using a jelly roll
• Matching thread to piece, and thread to quilt
• 61" x 61" wadding and backing fabric.
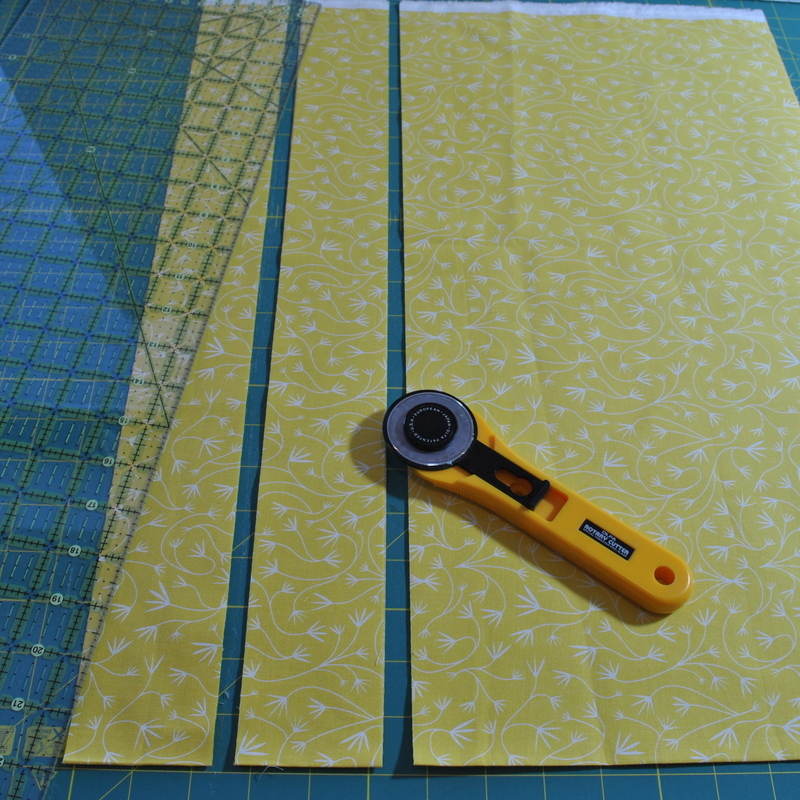
Cutting – see How to Cut Fabric for help using the rotary cutter, mat and ruler.
• From each of the eight long quarters, cut two 2½” x WOF strips, giving you sixteen strips in total.
• From the white fabric – cut sixteen 2½” x WOF strips, and six 4½” x WOF strips for your borders (see Point 16 below for more on this – you may choose not to join your borders, in which case you will need to rethink the cutting).
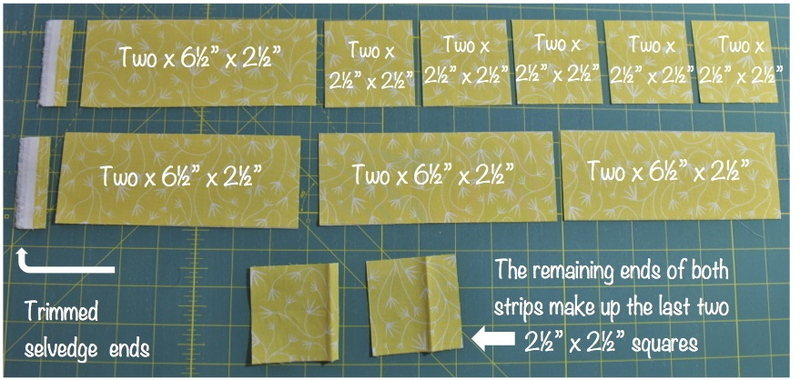
1) Lay out two of your patterned 2½” strips with the trimmed selvedge end on the left hand side (if you’re left-handed, swap this). From these you need to cut:
• eight 6½ x 2½” strips
• twelve 2½” x 2½” squares – you will get ten of these cutting from one strip, but you will need to unfold the leftover pieces from each strip to get your last two squares. Refer to the picture to make more sense of this!
If you are using a jelly roll with twenty different strips the cutting is different from above. Choose 16 strips, and from each one cut four 6½ x 2½” strips and six 2½” x 2½” squares - this will give you two blocks out of each strip, and two squares for two white blocks - see below.
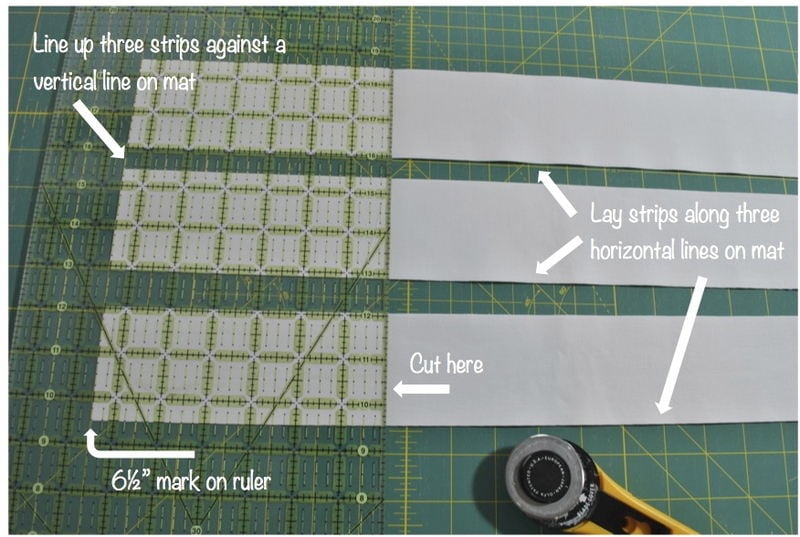
2) Lay out three white strips, again with the trimmed selvedge ends on the left side. Using the measurement marks on the mat, line the strips up against one vertical line, and then each one along a horizontal line to ensure they are straight. Place your ruler on top, aligning the 6½” ruler mark against the trimmed selvedge ends, and cut. Do this again twice to get six 6½ x 2½” rectangles from each strip – remember to check your strips are lined up with straight lines on the mat each time before you cut. Do this to eleven of your white strips to give you sixty-six 6½ x 2½” strips. (This actually gives you two extra, nothing wrong with a little contingency!) You will get a leftover piece at the end of each strip, cut these into eleven 2½ x 2½” squares.
3) Lay out your remaining five white strips, and cut seventeen 2½” squares from each strip – you will get sixteen by cutting through the double layer of each strip, but your 17th square comes from unfolding your last piece and cutting it down to 2½”.
So, you should now have:
In pattern – sixty-four 6½ x 2½” strips and ninety-six 2½” squares
In white – sixty-four 6½ x 2½” strips and ninety-six 2½” squares.
4) Split the patterned squares into two piles, one with eight of each pattern and the other with four of each.
5) Take your first pile (with eight squares) to the sewing machine, along with your white 2½" squares. Split the patterned squares into two sets, so you have four squares of each one in each set. Take your first set and attach a white square to each one - you can chain-piece these. Bear in mind, if you are using directional prints, take extra care to check which way up your patterned fabric is before attaching the white square. Snip your threads, and press the seam towards the patterned fabric.
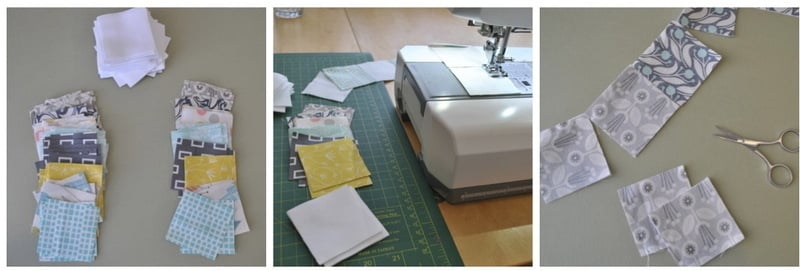
6) Take your sewn units back to the machine, and sew the second matching square to the other side of the white square, again this can be chain-pieced. Snip threads and press seam towards the patterned fabric.
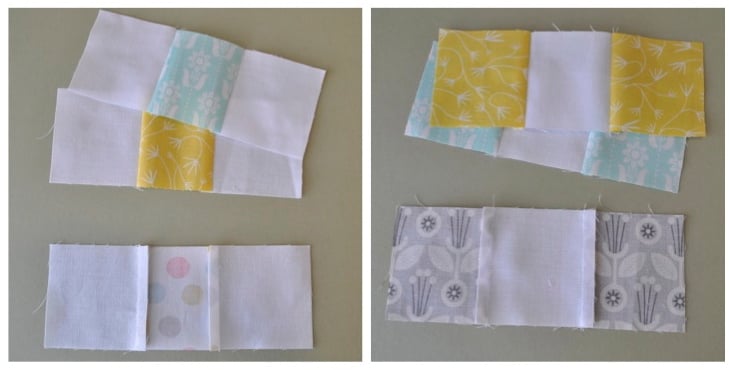
7) Now get your second pile, and do the same, but with a white square either side of a patterned one. Remember to check placement if using directional prints. Press seams towards the patterned fabric.
8) Take your first set of strips, and sew a matching 6½” x 2½” strip onto one side of each one, again checking for any direction, and chain-piecing as you go. Snip threads and press seams towards your new strip. Do the same with the other matching strip on to the other side of each block. These blocks are complete.
9) Take your second set of strips, and using the white 6½” x 2½” rectangles, sew these blocks together in the same way. Press seams toward your white strips. You should now have 32 patterned blocks, and 32 white blocks.

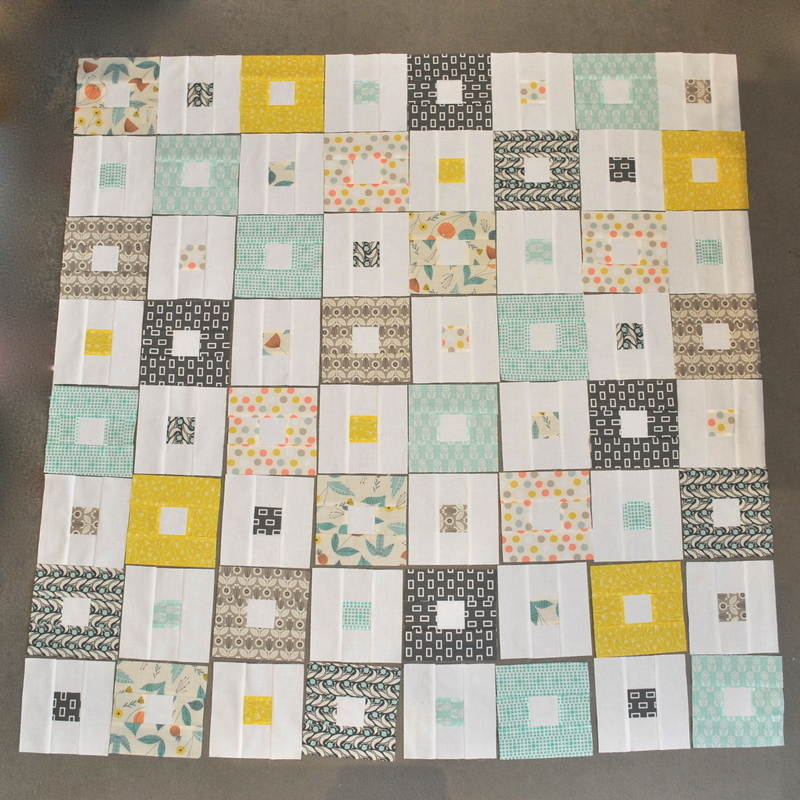
10) Find a clean flat space and lay out your blocks, alternating the two designs and randomly spreading out your patterns so no two are next to each other. You need eight rows of eight blocks. For your patterned blocks, have the seams running horizontally and for the white blocks, turn them so the seams run vertically – this will make sewing them together so much easier, and it also looks nice! Take a photo for reference, this will also give you a better impression of the overall look, is each design spread out evenly?
11) Start with the top row, working across the quilt from right to left, lay each block on top of each other - so in your pile for row one, you should have the block on the far right on the bottom, with the block on the far left on top. Do the same for the remaining seven rows, number each pile and take to the sewing machine.
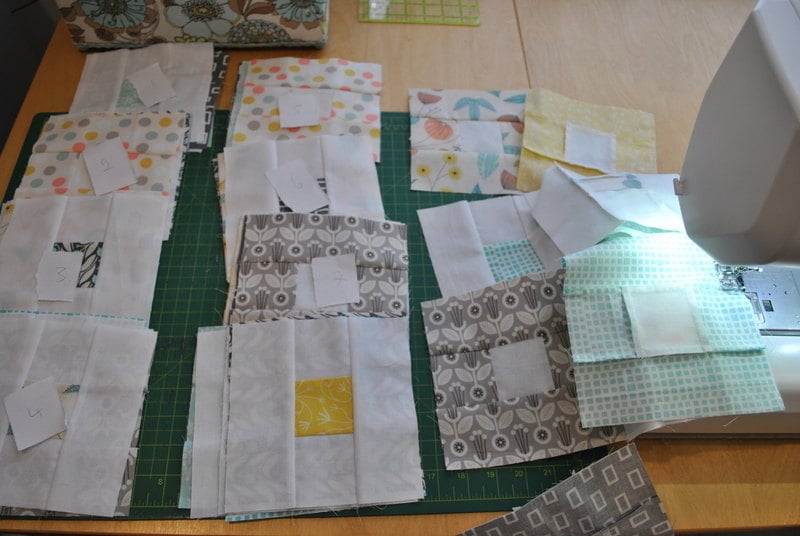
12) Start with row one, pick up the first two blocks, place the second face down on top of the first and sew down the right side of the squares. It is very important that you get this placement right or the order of blocks will go wrong and completely confuse your brain! Keep an eye on any directional prints. Also remember to check you have the direction of the seams correct – horizontal on pattern blocks, vertical on white blocks. Chain-piecing, do the same for the first two blocks of each row. Do not break thread between your blocks.
13) Pull your sewn squares back to the beginning, take the third square of row one, place face down onto the second square and sew down the right side. Carry on with the rest of the third blocks for each row. Continue in the same way for blocks 4, 5, 6, 7 & 8 of each row, without breaking thread between rows.
14) You should now have all your blocks sewn into rows and these rows joined together by your unbroken threads. Place face down onto your ironing board and press all seams towards the patterned fabrics - this will enable the blocks to lock into each other when you sew the rows together. Again refer to my Beginner’s Quilt for more help here. You can pin all the rows at the same time if you wish, just mind you don’t get pricked when you come to sew. Alternatively, you can take your time, and just pin and sew one row at a time.
15) Once you have sewn all your rows together, press all seams in one direction, and then gently press your top from the front, being sure not to press too hard or you'll distort your seams.
16) Now to attach your borders – again, we are doing this in the same way we did in the Beginner's Quilt, so if you need some pics to help you out refer back there. Measure across the centre of your quilt, it should be 48½”. Now, as you know, your border fabric is only 44” wide at the most, so you will have to join two strips together.
Some quilters don’t like doing this and prefer to have the borders in one long strip. To do this, you will have to buy more fabric, (approx. 57” (1.5m) in fact) and cut your border strips down the length of the fabric, instead of across the width… which is fine, but takes some thinking about, you only need four 4½” strips, so that's 18” in total, which leaves you with a lot left over. Now if you’re really clever you could work out how to get the 6½ strips and 2½” squares from your remaining fabric, but for this pattern, I have gone for the easier option and joined my borders. I also know I’m going to heavily quilt this top, so my joins shouldn’t be too obvious.
17) Take two border strips, and join at 45 degrees in exactly the same way we joine the binding in the Beginner’s Quilt. Trim seam allowance and press seams open. Cut this strip down to the width of your quilt (again it should be 48½” but if its not, don’t panic, just cut your border to your true measurement). Fold in half to find the strip’s halfway point, finger press the fold to mark, unfold and pin face down to the centre mark of one edge of your quilt top. Then pin outwards to each end.
18) Sew another border strip to what remains of your second strip, again at 45degrees, cut down to 48½” and pin onto the opposite side of your quilt top. Sew both borders into place and press seams outwards.
19) Measure your quilt’s new width, now taking in your borders, it should measure 56½” – again, if slightly different, just go with your measurement. Sew your cut-off piece of border to another border strip, and cut down to 56½”. Pin to a quilt edge, from the centre outwards. Sew your remaining two border strips together, and do the same. Pin and sew into place, pressing both seams towards the border. You have now completed your quilt top, well done!
20) Now to quilt. First you need to prepare your quilt sandwich. As you will see you need a wider backing fabric than normal width - so you could go and buy some extra wide backing - these tend to be around 108" wide, far wider than you need here, but quick and easy. Or you could buy two drops of 61" (just over 3m) and sew the two pieces together down their length - this will give you a backing 84"x61", again wider than you need, but easy. Or you could do what I do, and piece a backing. The plan below is what I came up with, you will need an extra nine patterned strips and five white/plain strips for this and 61" (1.55m) of white/plain (44" wide)
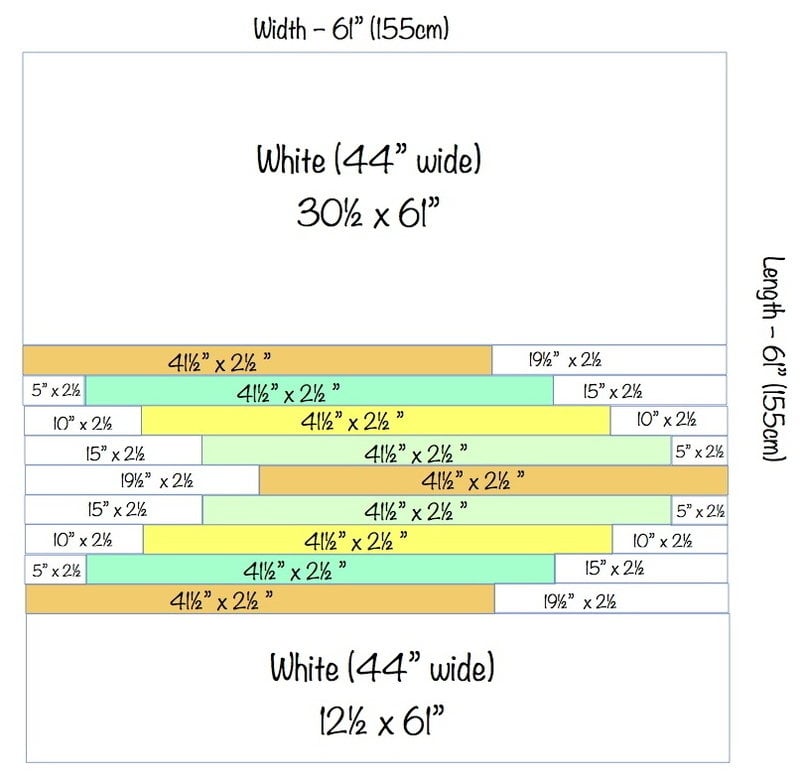
21) Sew each of the small white rectangles onto their 2½” strip, sew these together to make the centre panel as shown, then sew the white pieces onto either side. This should give you a backing 61" x 61". Follow the quilt sandwich tutorial on how to baste your layers together.
22) Now the dreaded "quilt as desired", quilting really isn't as scary as some people think and really is fun, you just need to relax! My Beginner's Quilt - the Quilting has quite a comprehensive guide on stitch-in-the-ditch quilting, which would look lovely on this quilt. You could sew down each vertical and horizontal seam, as in the Beginner's Quilt, then you could go on to quilt around each of the smaller squares.
To do this, rather than turning your quilt at every corner, I would start at the top of your first square - again start at the top middle of your quilt so you don't have the whole quilt in the machine - sew a couple of tiny stitches or a locking stitch, sew down the edge of the small square, when you get to the end of that square, lock stitch, raise your needle and move down to the next small square, not breaking your thread, and start again with a locking stitch. Do this all the way down your quilt, then go back and snip your threads. Not only is this quicker, but it also saves on thread. Moving towards the right, sew your next vertical row of squares, then rotate the quilt to sew the other half, and rotate again to sew the horizontal seams, in exactly the same way you did the main seams.
For this quilt, I decided to use my walking foot to sew random wavy lines across the quilt. In some lines I have stopped at a point across the quilt, turned the quilt and gone back the same way. I do love this design, and I'm very pleased with the outcome! Why don't you give it a try!
23) Once you have completed the quilting, trim all your edges neatly. Cut six 2½” strips, sew together into a binding strip, and sew onto quilt. Refer to Beginner's Quilt - the Binding for more on how to do this. Sew on a label with your name and the year, and you have now completed your quilt, congratulations!